Showing posts with label Makeup Tips. Show all posts

Wednesday, September 30, 2009

Treat Yourself "BEAUTY"

If you have it, flaunt it. We tell you how you can make your favourite feature look most irresistible on this special occasion.

Make Eyes
· Start by using an eyelash curler. This will open up your eyes and make it easier for you to wear makeup.
· Apply light eyeshadow on the eyelids, blending it gently towards the brow bone. Brighten up the eyes by adding a dot of gold on the inside corners.
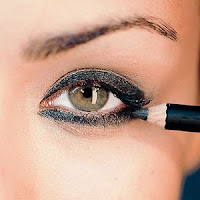
· With a steady hand, line your eyes with a black eye-liner. Create a winged effect by extending the liner half an inch outward from the corner of each eye.
· Apply a coat of mascara to the lashes to complete the look.

Expert tip: Try mixing gold pigment with eye gloss and use it as an alternative to eyeshadow.

Sculpt Those Cheekbones
· For an even skin tone, dot your face with a cream-based foundation and blend in gentle outward strokes. Pay special attention to the under eye areas.
· Take a peach-pink cheek colour and apply it on your cheeks using a thick brush, starting from the hollow, working towards the temples. Remember to blend it completely so that no harsh lines are visible.
· For a glam look, brush some bronzing powder on the cheeks.
· To add an extra dimension, use a hint of shimmer powder on top of the cheekbones.

Expert tip: Those with dark circles should avoid using shimmer powder on the cheeks, it will only draw attention to your problem.
Do Your Lips A Service
· Begin by outlining your lips with a lip liner to define their shape. Choose a liner in a shade similar to your lip colour.
· Fill in the base of your lips with the lip pencil. This will give the lip colour more depth and staying power.
· Using a lip brush, fill in your lips with a rich berry hue – one of the hottest lip colour trends of the season.
· Top with a transparent gloss or lip gloss of a similar shade as the lip colour for a glam effect.

Expert tip: When putting on lip gloss, a little goes a long way. To create the illusion of fuller lips, apply the gloss only to the middle of the lower lip, rather than to the entire surface.

Thursday, September 17, 2009

GET GORGEOUS

Whether you have an hour to primp for a party or just a few minutes, you have to be aware of the quickest tricks and the hottest beauty moves. Follow our make-up looks as created by Aliya Tipu and you're all set to go. Start off with a foundation; camouflage any pimples by applying a yellow-based cover-up for smooth finish. Always remember to pair a smouldering eye look with a crisp off-white nail polish. The combo looks elegant. As for the eyes you can opt for shimmery, metallic eye shadow which looks gorgeous though the most universally flattering shades are a neutral peach, copper, or bronze flecked with gold. Our expert shows us that it's fun to experiment with bright shades such as aqua and teal for nights out. Next, sweeten up your cheeks and finally pump up the volume. Now you know how to get gorgeous…

Thursday, September 3, 2009

Makeup tips every brunette should know

For every action, there is an equal and opposite reaction. As is the case with brunette girls’ makeup. While I doubt Newton ever worked behind a MAC counter, with every makeup tip I could offer a brunette, there’s a contradictory—yet equally appealing—suggestion. The biggest, most encompassing tip I can give is mix things up. Mix up the colors, mix up the looks, and always always mix up the emphasis. Don’t wear dark eyeshadow and liner in combination with burgundy lips or you’ll risk looking overdone.

Tip #1: You can get away with color. There are some sultry looks lighter haired girls can’t pull off as well as you without toning them down a notch. The traditional, sexy smoky look is much better left to the raven-haired girls, especially when they have dark skin, too. Mixing blacks and grays with nearly excessive amounts of eyeliner and a hint of silver shimmer for a night out looks stunning with the right frame around it and can look even scary with a light hair color attempting to embrace it.


Tip #2: You can get away with bare-faced beauty. You don’t have to use the color recommended above. Flesh tones look just as gorgeous on brunette girls (and are more appropriate for daytime wear unless you work on the set of a soap opera) as the darker, nighttime counterparts. Brunettes with fair skin can choose a light brown with a hint of peach or pink to warm it up, golden shimmer optional, to brighten their faces up without looking like they’re wearing any makeup. A thin line of brown eyeliner on the top lid and a single coat of mascara makes your eyes pop without screaming, “Look at my makeup!” Add a bit of coral-pink blush and some clear lipgloss and you’re done.

Tip #3: Wear color on your lips to avoid looking washed out. A nice medium pink or coral will add color to your cheeks and brighten your eyes. You’ll look more awake, whether your skin’s alabaster or ebony. You can skip every other type of makeup in a crunch, but slick on a lip color.

Tip #4: Wear icy bronzes, golds, pinks, or any other light color to plump up the appearance of your lips and add contrast with your hair. Not to mention this one’ll bring out your eyes. This one gives you the opportunity to look like the portrait of wide-eyed innocence if you play your eyes up right. Put a little navy shadow on your lids, line just the tops, and go heavy on the mascara. There’s not a guy who could resist your gaze.

Tip #5: Bronzer is your friend. At least some point in every girl’s life, she wishes she had a tan if she doesn’t. A lot of brown haired girls feel they don’t quite look right if they don’t have dark skin to match (I’m not agreeing with that notion, just offering tips). Some of us are so fair skinned we couldn’t get a tan if we were left on a deserted island for 3 years or, on a more realistic scale, hopped in the tanning bed every day for six months. Bronzers and sunless tanners are healthier alternatives to tans for those who can achieve them from the sun and the only option for those who can’t tan. So if you need a tan to feel good about yourself, turn to sunless tanners and bronzers for an instant boost. And they do look very good with dark hair.

Tip #6: If you’re pale, love it. Renee Zelwegger and Reese Witherspoon recently went brunette with their pale skin. Did they hop in the tanning beds or go for heavy airbrush tanning? Nope! And you know what? They still look hot.

Tip #7: Red lipstick during the day is a faux pas. Even though this is a tip for everyone and not just brunettes, I decided to throw it in. Bright red lips during the day are usually a bit too shocking on everyone else’s eyes. Tone it down a little. Just because you have dark hair and red lips look outstanding with it, you don’t have to wear it all the time. If you love red too much to let it go, opt for a gloss version. It’s sheerer and juicy, not scandalous.

Tip #8: Sport the ruby lips if you wish! Don’t wear bold reds during the day but matte wine lipsticks can look fine for daytime wear if you keep your eye makeup muted and your hair’s on the darker end of the brunette spectrum.

Tip #9: Wear brown shadow: Brown shadow looks good with all hair colors and eye colors. It works especially well with brunettes because it ties their face and hair into one complete picture. Added bonus: it makes blue eyes really stand out (try bronze for blue eyes!).

Tip #10: Skip the brown and be different! Of all the hair colors out there, brown haired girls can get away with the most palettes. If your eyes are brown, you can wear any color of eyeshadow available. With more flamboyant colors, you stand out in a crowd. You may even get labeled as the fashion queen at your workplace. And that’s never an insult.

Tuesday, August 18, 2009

Eye shadows - Choosing for Yourself

The eye shadow you choose should flatter and enhance your eye colour and the shape of your eyes, as well as your whole appearance. The skin colour, the eye colour, and your life style need to be considered when choosing and using eye shadow. Although there are no hard and fast rules for choosing the colour of your eye shadow it is best to find out by experimenting with colours. But always harmonise the colour of the eye shadow with that of your skin and your eyes. Whatever the colour, it should be blended in well, so that there are no harsh lines. Aim always for a natural look.
Purpose of Eye Shadow

Eye shadow goes on each entire lid and sometimes in the space between your lids and your eyebrows. It comes in a variety of colours and also several different forms, including cream (good for dry skin), matte (good for oily skin) and pencil (good for all types of skin).
Different Forms of Eye shadows

Apart from colour, there is a choice of forms of the eye shadows. You can choose from pressed powders, pencils, sticks, gels, crayons and creams. Pressed powders are still the most popular form of shadows, because they are the easiest to apply and control. These are available in pearly and matt textures. The effect is not long lasting, but if you apply them with a wet brush, you can get a deeper effect and increase the staying qualities of the colour.

The cream based eye shadows are oil or wax based. They are best suited for dry lids and should be avoided on oily lids. Sticks are a firmer form of cream shadow and look quite like lipsticks. Pencils have, however, almost totally replaced sticks and crayons. They have a high colour and filling ability. Gels are suited for oily skins. These give a long lasting, subtle and translucent effect. Liquid shadows also have a long lasting effect, but are difficult to apply because it is difficult to get an even flow of colour with them.

Friday, August 14, 2009

How to apply makeup for your model photo shoot

You most likely already know how to apply makeup for everyday use but there are a few things that are different in applying makeup for a model photo shoot. It's not that difficult to learn and if you follow the tips below, you will be on your way to better makeup results for your model session.

Apply a heavier coat

The first key to model makeup is to simply fix your face as if you were going out for the evening, wearing more than for daytime use.

Create extra contrast and especially use more powder. I cannot stress powder enough. This is essential!

To achieve that natural look in your model portfolio, apply a little more than you would in your daily activities and even more than you would if you were going out for the evening.

When you look in the mirror you will feel that you are wearing too much makeup but remember that the studio lights will reduce the amount of makeup you have on so don't worry.

How do you achieve the model look? Follow the simple steps listed here and, with a little practice, you should be able to get the results you're after and have a successful makeup session.

Moisturizer & Concealer

First, moisturize your face thoroughly and then follow with concealer. The concealer you use for photos should be 2 or 3 shades lighter than your skin tone.

You will use concealer in order to hide blemishes, to lighten your eyes and you'll need concealer to hide any discoloration around the eyes or lips.

The Foundation


Now, you'll want to use a good, solid foundation and apply it evenly over the face.

Foundation application is very simple but is misunderstood by even some professional makeup artists.

Match the foundation to your chin and neckline. If you miss this step, you and the camera will see a sudden change of color from your face to the neck or upper chest.

Some makeup artists even apply makeup to the neck and shoulders! Why you ask? To match the body to the face. You will have no need to apply makeup to your body (except to hide blemishes) if you follow the suggestion of matching your makeup from the face to the neck.

When you have completed applying your foundation, just apply the rest of your facial makeup as you would normally but apply in heavier amounts for the camera and lights.

Powder

Powder! Powder! Powder! Be sure to remember the powder!

I'm sure you've seen makeup artists apply makeup to actors to get them ready for a TV show or the movies. If you have you must have noticed that the makeup artist is constantly patting the actors face with a powder applicator. Have you wondered why?

The reason is that powder, and lots of it, is nescessary to create that beautiful matte finish which is always present in a great portfolio. "But I never use powder." you may say. Even so, please use it for your model photo shoot. Powder makes the difference between a beautiful photo and just a photo.

When applying powder, use a lighter shade under the eyes to help eliminate any shadows or dark circles that the concealer didn't take care of.

Applying Facial Makeup - The Oval Look

Now that you understand the importance of using powder, apply makeup below your cheekbones and under your chin to create an oval look to the face. Be sure to blend the makeup in and not create distinct lines. Put this makeup on a little darker but not too heavy.

Lip Color

In order for your lips to stand out and be noticed, be sure that your lip gloss is a solid color and at least one shade deeper than you normally wear it.

Your lip liner should be the same color as your lipstick.

DO NOT WEAR BLACK LIP LINER!

Stay away from any frosted lip colors entirely because they hardly show up on film and will give the illusion that you are not wearing lip color at all. The only time you would wear frosted is when it's for some effect the photographer wants to accomplish.

Blush

Apply your blush a little heavier than normal but neatly and precisely. Don't over or under apply blush. This will also be in accordance to the effect you or your photographer want to accomplish with your look for this particular model shoot.

Eye Makeup

In order to produce the best results, your eye liner needs to be applied starting from the outside of the lower part of the eye and extending about 3/4 length toward the inner part.

Really work on those eyes and lips. These are the two key features in a model photo shoot as with just about any other people photography so get this right!

You'll need to use an eye shadow to compliment the rest of your makeup and clothing but use a light shade so that your eyes will appear more alive.

Start by applying your eye shadow to the upper eye lid and above the eye just below the eyebrow.

The reason you'll want this a light shade is because a darker shade will create an illusion of darkening of the eyes and will give the appearance that you did not get enough sleep the night before which is not going to be very flattering to you. Stay with a light eye shadow to be sure and create the best results for your eyes. If done right, the person looking at your photos will be drawn in directly to your eyes first which is what you normally want to achieve.

Take it With You!

Lastly, be sure and take your makeup case with you to your model photo shoot. You will need to touch up your makeup during the photo shoot and will always need to add powder as the day moves on. The photographer or makeup artist will not likely have your brand and you certainly don't want to halt the shoot while you go home for more makeup.

Do your best to follow these steps when applying makeup for your model photo shoot and you should get good results from your photo session.

If you plan to do your own model makeup, please apply your makeup before leaving home for the session to make the photo shoot go faster and smoother.

Sunday, August 9, 2009

Top Tips for Party Makeup

Who doesn't want to become a highlight of the party and all you need to grab attention is have a perfect party make up that can set eyes on you. Here are some top tips for party make up which you can use to seek attention from crowd. For a glamorous evening look in a jiffy, you can add a few lashes to the outer corners of your eyes. You use waterproof glue and the eye lash will not come off until you want them to. For your lips, you can try mixing a true red lipstick with a gold or silver gloss. You could also reduce the strength of the red by mixing it with one of your neutral lip colors. You can keep the eyes simple and the cheeks simple with just a flush of color. Blush is often the last cosmetic that is used when doing makeup. The ways of applying blush differs with different types of faces. It is important to choose the right application of blusher since it can make your face look longer or wider.
Here are some tips which you can use while applying blush:
You can put on some shimmer on the highest point of cheekbone. This gives a sexy and cool look.

You can highlight the cheekbones by using a slightly darker shade on eyes. You can blend it with the cheek for a more natural look.
You need to use clean blush brushes. This can prevent bacteria transfer in skin.
When you are applying translucent powder, you can dilute powder blush. However, gel and liquid blush have to be washed off from the face and the makeup has to be redone again in such a case.
Cream blush can be used on lips for getting a soft color and this should be applied using the fingertip.
You can use a dusky pink blush and this can help warm and freshen up the face. This is especially on the areas below the ears. However, the blush on chin may not look good, if your neck is lighter than your face.
Frosted blush may not be something great to apply. Frost on lips or eyes are in fashion during parties at night. You can use them in the night to highlight the eyes. You can get that look by applying a light colored frosted eye shadow or lipstick. It should be in hue of colors like gold, silver, light pink, peach, champagne and beige. Frosted highlighting powder can also be used in your face.